Now that you have prepared your database for a hosted environment you are ready to upload your database.
- Open the FileMaker Admin Console by double clicking the icon you downloaded in Step 2.

- Login to the FileMaker Admin Console using the username and password from your welcome letter or the product detail screen in our Customer Portal area (see Step 1).

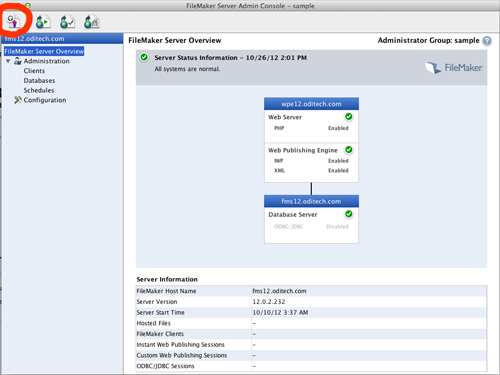
- After successful login you will see the overview screen, which shows the server status and server information.
- To start the upload process you will click the "Upload Database" icon in the upper left of the window.
- The "Upload Database Assistant" window opens. Click on the folder in the window to specify that we want to upload a database into this folder. Click the "Add Database" button. Locate your database on your computer and click the "Select" button. Now click the "Next" button to continue.

- In the next screen leave the option "Automatically Open Databases After Upload" checked and click the "Next" button.
- The database will now begin to upload. Once complete click the "Next" button.
- You have now successfully uploaded your database. Click the "Finished" button to close the upload assistant.
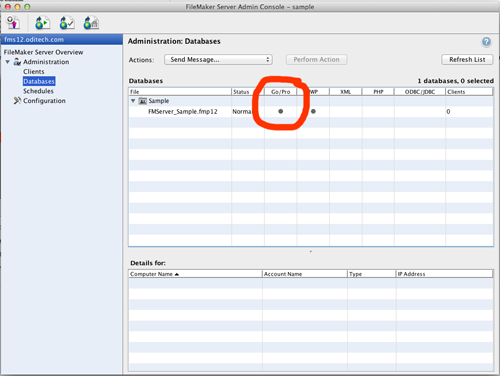
- You will be returned to the "Databases" screen showing you the databases that are hosted on the server. This screen will show you the database status as well as the types of access that are available to this database. Please make sure that the "Go/Pro" box has a bullet in it.
- Please remember that if you upload more databases than you are allowed with your account, our system will automatically charge you an additional hosted database fee.
You are now ready to login to your hosted database. If you are done with the FileMaker Admin Console you can quit this application and proceed to Step 5.
